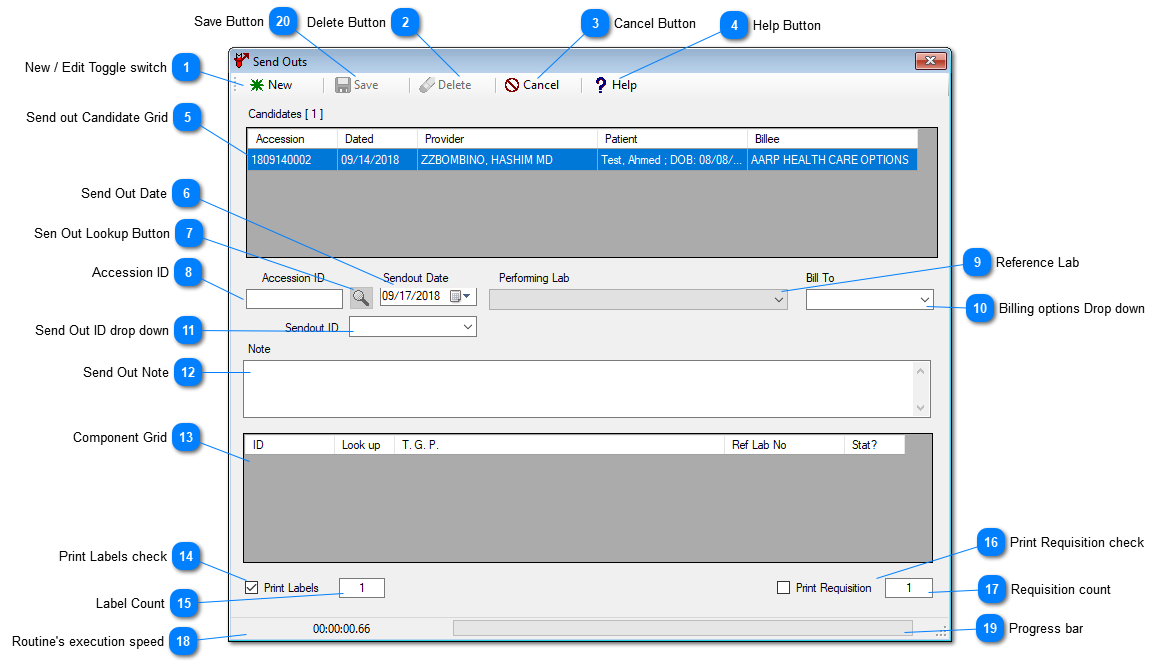
The Send Out routine under the accession menu, has been provided, to outsource the test, Prolis using lab can not perform the service
on. locally. The routine is programmed to pull the cadidate accessions, to be outsourced, automatically, based on any component configuration
( Inhouse = No ) within the accession or the entire accession's property of ( Inhouse = No ).
Clinical Significance of Send Out record
A send out record of an accession in Prolis, ensures the CLIA compliance of the patient result reporting. A component entry in the send out record
warrants a proper indication of place of service performance on the result report. A component serviced by a Reference Lab (other than the local
lab), is denoted with 3 stars preceded by the component name, with the performing lab's 3 digit code at the end of the result line and listing of the
performing Reference Lab particulars at the end of the report.
Billing Significance of the Send Out record
Depending upon the 'Bill To' option selected while creating the record, Prolis adjusts the billing during the
Synchronization of the billing process.
See the control 10 - Billing options drop down, for implication detail of each option.
Instant Procedure
Upon accessing the routine all unresulted accessions, either marked entire accession for outsourcing ( Inhouse = No ) on the Requisition screen
or any of the accession's components configured for outsourcing ( Inhouse = No ) on the component configuration, are displayed in the Candidates
Grid (Control 5) of the routine.
To create a new record, a) Leave the
New / Edit Toggle Switch at 'New'

. b) Select the
Performing Lab. c) Double click the desired
accession from within the Candidate Grid. d) Change or leave (Current - default) the Sendout Date. e) Select the desired 'Bill To' option. f) Enter any
Note if needed. g) Check or uncheck the Print Labels with the desired label count. h) Check or uncheck the Print Requisition, printing with the desired
copies and finally i) Click the Save button.
Please note the the resulted accession or the accession with the send out record created, will not appear in the Candidates Grid.
To force Prolis to create a new send out record of a resulted accession, a) Leave the
New / Edit Toggle Switch at 'New'
. b) Select the
Performing Lab. c) Enter the desired accession in the Accession ID field (control 8) . d) Change or leave (Current - default) the Sendout Date.
e) Select the desired 'Bill To' option. f) Enter any Note if needed. g) Check or uncheck the Print Labels with the desired label count. h) Check or uncheck
the Print Requisition, printing with the desired copies and finally i) Click the Save button.
To Edit an existing record, a) Leave the
New / Edit Toggle Switch at 'Edit'

. b) Enter the desired accession in the
Accession ID field
(control 8) . c) Change or leave (Current - default) the Sendout Date. d) Adjust the desired 'Bill To' option. e) Enter or change any Note if needed.
f) Add or remove any component in the Component Grid. g) Check or uncheck the Print Labels with the desired label count. h) Check or uncheck
the Print Requisition, printing with the desired copies and finally i) Click the Save button.
To Delete and existing record, a) Leave the
New / Edit Toggle Switch at 'Edit'
. b) Enter the desired accession in the
Accession ID field
(control 8) . c) Click the Delete button when it becomes active, after the record is displayed.
 New / Edit Toggle switchThe toggle switch, to switch the routine's mode between 'New' and 'Edit'. The default mode is 'New' mode.
|
|
 Delete ButtonThis button is clicked to delete a send out record. The button becomes active only when the record to be deleted is selected.
|
|
 Cancel ButtonThis button is clicked to either stop a long running process or to close the send out window.
|
|
 Help ButtonThis button is clicked to either activate the context sensitive F1 help or access the entire system's help.
|
|
 Send out Candidate GridThis grid displays send out candidate (unresulted accessions) upon opening the windows and refreshes itself upon saving and deleting the sendout record,
removing the saved or deleted candidate.
|
|
 Send Out Date
|
|
 Sen Out Lookup ButtonThis button is to be used to look up existing send out records. It is only active in the Edit mode.
|
|
 Accession IDAn editable field, representing the Accession ID, being outsorced either a whole or a few of its ordered components.
|
|
 Reference LabThis is the drop down to select the desired Reference Lab from the list of all Reference labs set up in Prolis.
|
|
 Billing options Drop downSelect one of the options, instructing the Reference Lab, to bill to. The options are;
1. Me. This option instructs the Reference Lab to bill to the local lab (sending lab). The local lab is enabled to bill the accession using Prolis.
2. Insurance. This option provides all the billing informations to the Reference Lab, insructing it to bill to the Insurance Company of the patient.
3. Patient. This option instructs the Reference Lab to bill the service to the patient.
4. Gratis. This option requests the Reference Lab to perform this service free of charge.
|
|
 Send Out ID drop downThe routine creates a unique ID for every sendout upon a new entry. The created ID is accessable and usable to edit any existing record.
System is capable of generating / dividing an accession among multiple Reference Labs, one send out ID per lab.
|
|
 Send Out NoteA multiline note can be entered/edited, associated with the Send Out record.
|
|
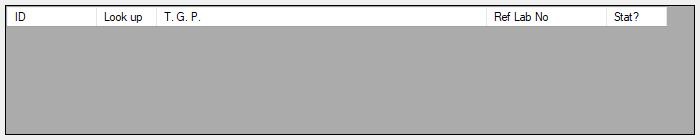
 Component GridThe component grid displays all the components under the accession, configured to be sent out to the Reference Lab.
The left most column lists the component ID setup in Prolis, the column 2 button can be used to lookup any other
component uder the accession, to make it the part of the send out. Colum 3 displays the component name, the column
4 lists the Reference Lab's identifier (mapped to Prolis ID of the component in the Reference Lab setup record - Outsourcing).
The Column 5 indicates if the component is marked 'STAT'.
The basic component (individual Test) is displayed without any mapping with the Reference Lab but for Groups and Profiles
the component's mapping must exist in the Reference Lab record, to get displayed in the grid, automatically.
|
|
 Print Labels check
|
|
 Label CountAn editable field to indicate the required no. of labels, to print.
|
|
 Print Requisition checkPlace a check mark to print the Requisition or uncheck to skip printing of the same.
|
|
 Requisition countIndicate the no of requisition copies to print.
|
|
 Routine's execution speedThe fields displays the execution speed of the routine, in the format of HH:mm:ss.nn
(H = Hour, m = Minute, s = Second, n = Milisecond).
|
|
 Progress barIndicates the operation progress.
|
|
 Save ButtonThis button is clicked to save the send out record. This button becomes acrive only when all of the required data is provided to the routine.
|
|