Analyte Management
A Prolis routine to setup a new Test (a root level lab service) or edit an existing one in the system.
The routine's mode is switched from Edit (default) to New, by clicking the mode toggle Switch,  or
or 
Instant Procedure
To enter a New Test or Edit an existing Test, change the mode accordingly.
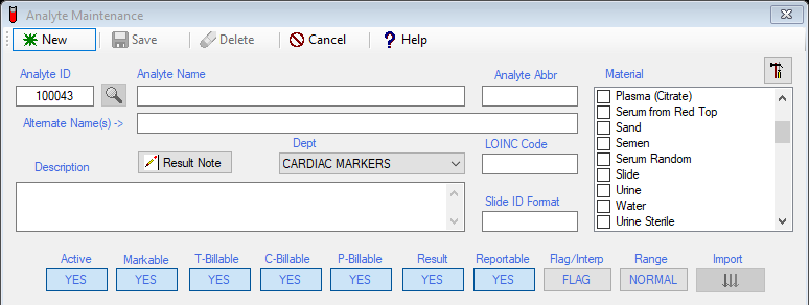
A. Enter or edit the full name of the test in the Analyte name field.
B. Enter or edit the abbreviated identifier in the Abbr field. Recommended length is 3-5 characters.
C. Select or change the most appropriate material(s) from the Material list. Be very cauntious to select multiple materials for a test. Only select multiple materials if you are sure of such. No material is required for the test, having its result calculated from other results within the accession. For informatory Test, only use the 'Service' as a material. It is efficient to use only one material among multiple choices with similarites (Urine, Urine Sterile, Urine non-sterile, Urine with preservative).
D. Enter alternate names of the analyte, separated by the pipe character ( | ) in the Alternate Names field. These names build the list of associated medications of Toxicology testing, in Prolis. This association is used upon observed values validation for consistency or inconsistency of the prescribed medication. A care is suggested for the spellings of the names.
E. Click the Result Note button to enter a informatory comment note, if needed. This Note will appear under the test result line, on the report, based on the setup of the 'Report Analyte Note', on the Reporting Tab of the routine.
F. Select the appropriate department of the Test, using the Dept drop down.
G. Enter the correct Loinc code (optional), in the LOINC Code field.
H. Enter the detail description of the test (optional) and Slide ID format (optional) in the related fields.
I. Adjust all 9 switches per your requirements / liking, using the following guideline.
, a user of the Outreach and is exported on the compendium, to be used by various EMR connections to the Lab. However, a
Unmarkable test can ba part of a Group or a Profile (implicit use).
Third Parties like Commercial Insurances, Medicaid and Medicare. This billing option requires an entry of the CPT code and
the List Price of the test, on the Billing Tab of the routine.
Billing Tab, for this option.
include phlebotomy charge and travelling mileage.
the Interpretation on the report. A good example of this setting is to show INCONSISTENT (interpretation) vs A (flag).
Range or the Cutoff value on the report.
J. If Markable = YES, you may enter or change the extended ordering modifier, an optional custom filter. For example if you want the system allow the PSA be ordered for only Male patients above the age of 40.
K. For any Billable = YES, must setup atleast the List Price to > 0 and for TBillable = YES, must setup the CPT Code, in
addition, using the Billing Tab, before the system would allow you to save the Test.
L. For Result = YES, using the Result Tab, setup the Result Type (Numeric or Choice), Unit of Measure, specify the decimal
point. If calculated test, check the Calculated field and enter the formula. Enter the desired system Ranges for the Test.
M. Click the Save button.