Under the Accessions, PROLIS provides a routine to manage Remote Accessions. Remote Accessions come from external sources such as the web portal (Outreach) or an EMR integration. They can also be accessions done in the lab, when the lab has yet to receive the sample. This module receives the specimens of the orders created locally as well as remotely.
Instant Procedure:
-
Select the 'Entry Point' for the Remote Accessions. By default, the 'Entry Point' is "All" for search. -
Optionally, user can search by providing the 'Courier Route', or Client and/or ACC/Req/MNR number. -
Click on Search Button to get the data in the Data Grid. -
Select a particular record from the Datagrid, the required specimens content grid will pop-up for that accession. -
Select the Received-check box in the grid if specimens received. -
Click the Receive button.
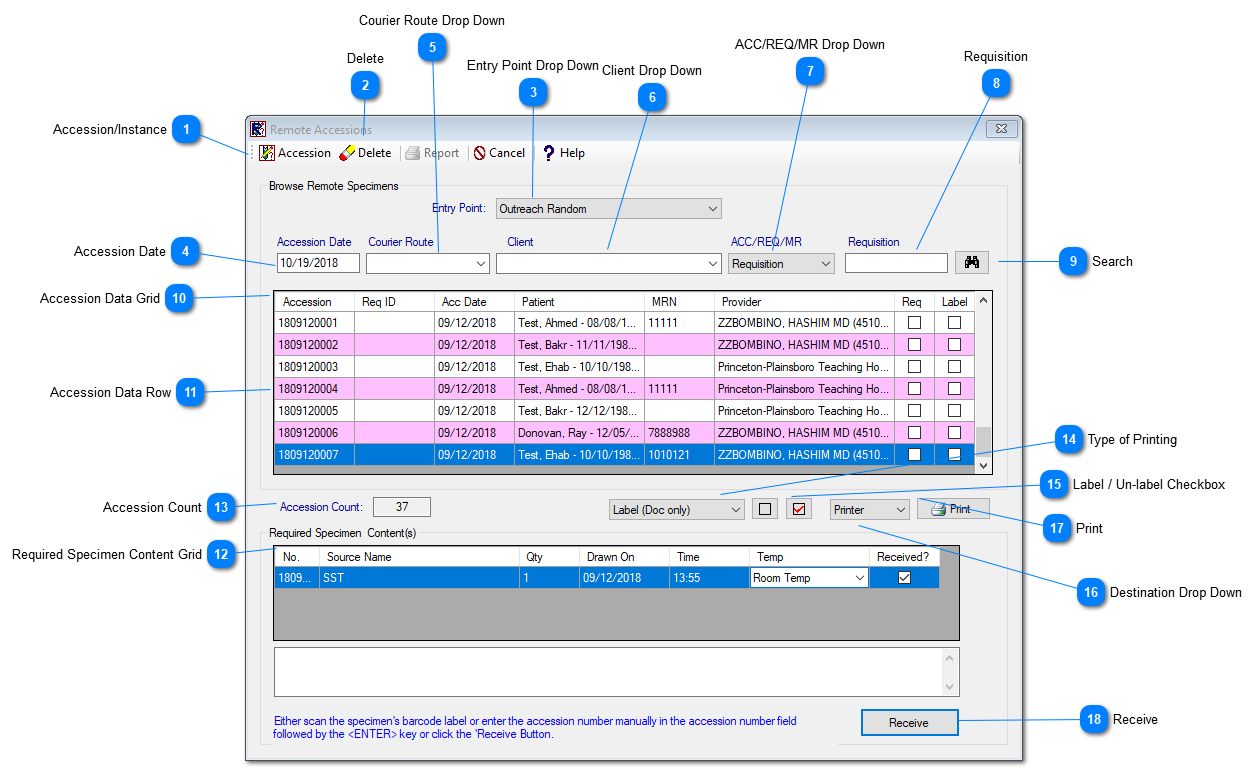
 Accession/InstanceAccession/Instance :The toggle switch, to switch the routines mode between 'Accession' and 'Instance' mode.The default mode is 'Accession' mode. Currently accession mode is the only active mode. Instance will be part of a future update.
|
 DeleteThis button is clicked to delete a send out record. The button becomes active only when the record to be deleted is selected.
|
 Entry Point Drop DownThe Entry point drop down suggests the ways from where the PROLIS can get the Remote Accessions. By default, it will have 'ALL'. Other Entry Points are:
-
EMR Random: Orders created in EMR systems that are transferred through Prolis via an interface. -
In-Lab Infinite: Standing orders created by the lab without a definite end date. -
In-Lab Timed: Standing orders created by the lab with a definite end date. -
In-Lab Un-Received: Orders created by the lab when the specimen is not yet received. . -
Outreach Infinite : Standing orders created by through Outreach without a definite end date. -
Outreach Random: Orders created through Outreach. -
Outreach Timed : Standing orders created by through Outreach with a definite end date.
|
 Accession DateBy default, the system pulls up the current date. please NOTE: only remote accession for that date and prior will be shown. To see the remote accession for future orders, the date must be changed.
|
 Courier Route Drop DownSelect the Courier Routes to get accessions for multiple providers on the same route.
|
 Client Drop DownThis contains the list of providers who have orders in the remote accessions table. The user can select the provider from the drop down to filter the search.
|
 ACC/REQ/MR Drop DownOptionally, search can be the basis of Accession, Requisition or MRN number. Select the appropriate option from the drop down.
|
 RequisitionIt accepts the number based on the selection made in the previous drop down..
|
 SearchClick the button to get the results in the Data Grid below.
|
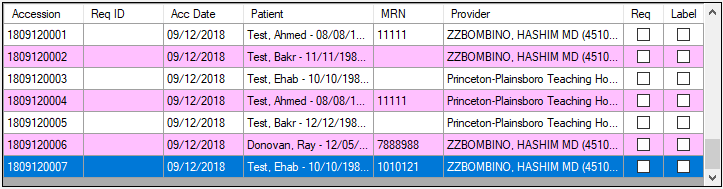
 Accession Data GridThe records are displayed here as the selection criteria made by the user. By default, all the records will be displayed .
|
 Accession Data RowSelect the specific row, the specimen contents will be populated in the 'Required Specimen Content Grid'.
|
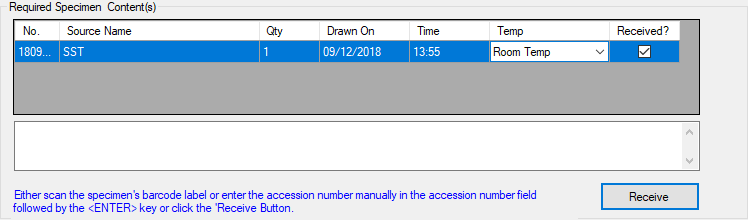
 Required Specimen Content Grid
This grid displays the specimen contents of the selected Accession. Only put a checkmark next to the specimens received.
|
 Accession CountIt provides the count of Accessions.
|
 Type of PrintingSelect the type of Printing from the dropdown. By default, it is Label (Doc Only). This will only print the barcode label. The others are:
-
Label (Doc + Src) - Print Barcode Label and Requisition -
Requisition - Print Requisition Only
|
 Label / Un-label CheckboxSelect /Unselect either one of the checkboxes to get the labels included in the accessions while printing.
|
 Destination Drop DownPrinter is the default selection. User can choose to print to screen (For requisitions only)
|
 PrintClick the button to print the labels/and or requisitions.
|
 ReceiveClick the Receive button to confirm the specimen is in the lab, and this will create the accession within Prolis.
|
|