Pre Authorization Management
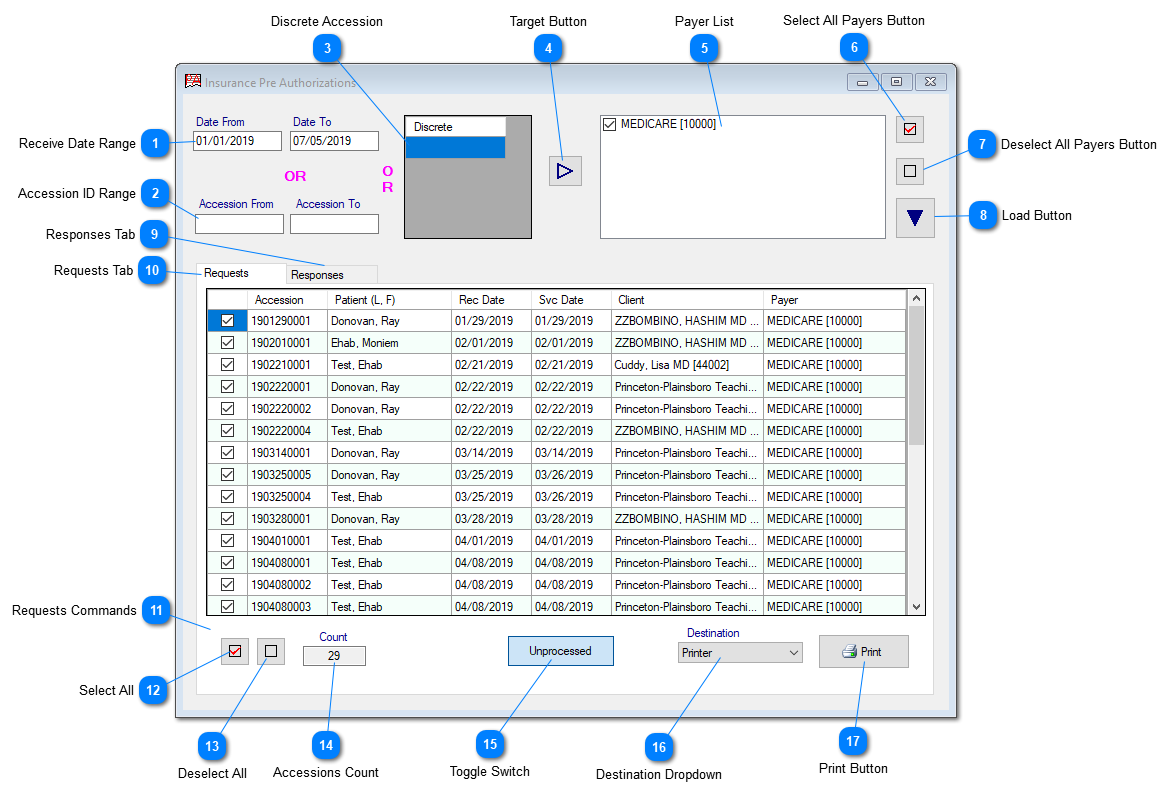
Insurance PreAuthorization routine in Prolis, provides you the capability to print the payer specific pre-authorization forms and record the response received from the payer in return. The same routine will be enhanced to accommodate the electronic version of the process if and when any payer makes the API available, to interact with.
Instant Procedure:
The routine assumes the payer specific authorization report forms have been setup in the Payer Management, prior to interacting with this routine. The routine will not pull accessions in the absence of the form in the Payer's record.
-
 Receive Date RangeThe Receive Date Range is comprised of 2 fields, to enter the starting date and the ending date in 'From' and the 'To' fields respectively. The routine works on a single date if either of the fields, is entered. This date range is exclusive to the accession date range and the discrete accessions field.
|
-
 Accession ID RangeThe Accession ID Range can be used to enter the starting accession ID and the ending accession ID. The routine works on a single accession ID as well. This accession ID range is exclusive to the Date date Range and the discrete accessions field.
|
-
 Discrete AccessionThe field accommodate multiple discrete accession IDs, one per line. This discrete accessions field is exclusive to the date range and the accession date range.
|
-
 Target ButtonThis button when clicked, after entering one of the 3 initial parameters (date range or the accession range or the discrete accessions), pulls the payers associated with the accessions resulting from the initial parameter.
|
-
 Payer ListThe list of the payers resulted by clicking the Target button. This list can be used as a 2nd filter to the accessions, being processed for the PreAuthorization.
|
-
 Select All Payers ButtonClick this button to select all the payers in the list.
|
-
 Deselect All Payers ButtonClick this button to deselect all the payers in the list.
|
-
 Load ButtonClick this button to pull all the accessions based on your filters.
|
-
 Responses TabClick this tab to enter the payer response to the PreAuthorization.
|
-
 Requests TabClick this tab to process the PreAuthorizations.
|
-
 Requests CommandsAll the Requests Tab commands, to be used to process the preauthorizations.
|
-
 Select AllClick this button to select all the accessions in the grid.
|
-
 Deselect AllClick this button to deselect all the accessions in the grid.
|
-
 Accessions CountIndicates the number of accessions in the grid.
|
-
 Toggle SwitchA toggle switch between 'Unprocessed' and the 'All' cases.
|
-
 Destination DropdownThis dropdown presents 2 choices, Printer on the Screen. The later only appears if selected accessions are less than 5. The screen choice is used only for viewing. The printer choice registers the processed pre authorization, in Prolis, to be ready to accommodate the payer response.
|
-
 Print ButtonClick this button to either print (on the printer) and register to receive the subsequent payer response or just the view.
|