This routine is designed to post, modify or delete a payment of all 3 types of billing, Client, Insurance and the Patient. This routine can also be used to edit the electronic payment posted using the
ERA Processing.
Instant Procedure
New Payment
a) Click to toggle switch (Field 1), to say 'New'.
b) Select the desired AR Type (Billing Type) using the field 4.
c) Enter the document number (check#) in the field 5.
d) Enter the payer ID in the field 7 if known otherwise click the payer lookup button (field 8) to select the payer who sent you the payment.
e) Change the posting date if needed.
f) Enter the check amount or the total payment amount in the field 10.
g) Enter the first invoice ID if known, in the field 11 and press the TAB key or use the invoice lookup button (field 12) to select the invoice to apply an amount to.
h) Enter the porting amount of the check you want to apply to the entered or selected invoice.
i) Click the 'AutoApply' button (field 16) if your system is been in use for a while (to have the history of each line items, the payment is being applied to), or else use the Paid column of the Payment Detail Grid (field 15), to enter the amount to be applied against each line item. By default, Prolis will write off the difference between the billed amount and the paid amount, thus yielding the balance as zero (0.00). You may modify the WO column amount, to make the balance as non-zero.if there is a no need to re-bill any amount to the patient otherwise move to the next step.
J) If there is a need to bill a portion to the patient, click the BillPR column cell of the line item and press the key ENTER or the TAB. The written off amount will be transfered to the PR column. Change this PR amount to the one you need to bill to the patient and press the ENTER key or the TAB. The system will adjust the amounts accordingly to balance itself.
k) When you are done with all the line items, click the Save Button (field 2).
Edit Payment
a) Click to toggle switch (Field 1), to say 'Edit'.
b) Enter the document number (check#) in the field 5 or click the Payment Lookup button to select the payment to edit.
c) Click anywhere on the row of the invoice to edit, within the Invoices Grid (field 13). Prolis will display all the line items of the clicked invoice.
d) Make the desired changes within the Payment Detail Grid.
e) When you are done with all the changes, click the Save Button (field 2).
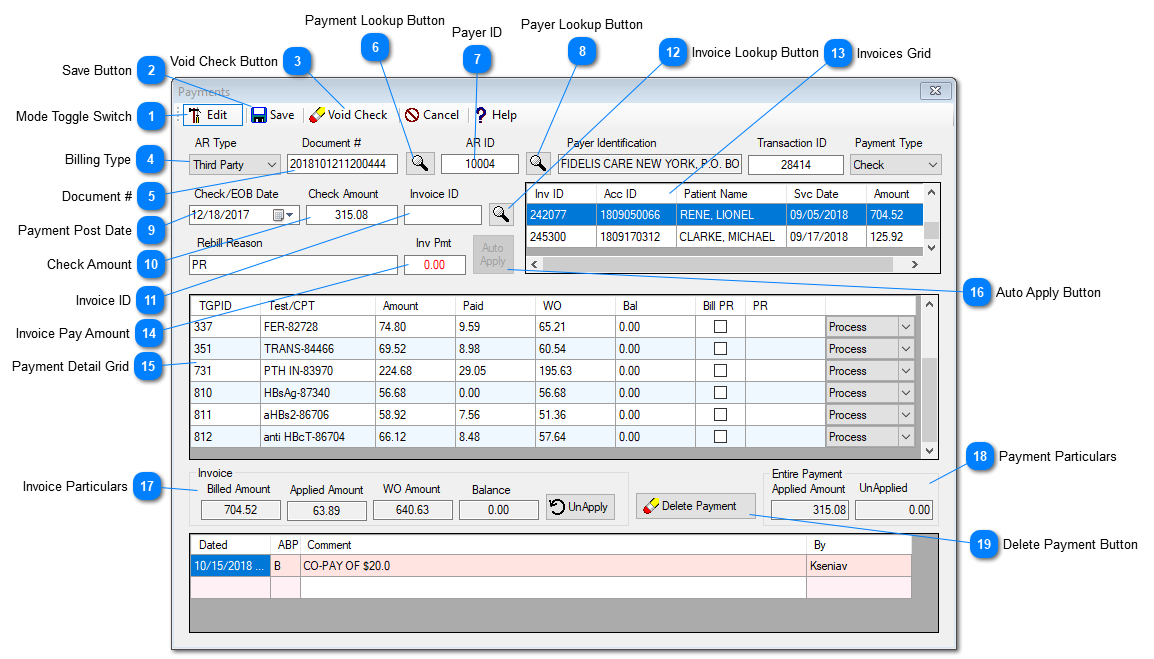
 Mode Toggle SwitchThis switch is used to toggle the mode between 'NEW' and 'EDIT' back and forth.
|
 Save ButtonThis button is clicked to the data entry or edit made to the displayed payment.
|
 Void Check ButtonThis button is used to delete this displayed payment record, along with all the amounts applied to invoices. A caution is suggested to take while using this button. For deleting the amounts applied to a specific invoice, use the 'Delete Payment' (Field 19) instead.
|
 Billing TypeThis dropdown is used to select the desired customer type from available 3 types in Prolis (Client, Insurance and the Patinet).
|
 Document #The document number is the Check number or the payment identifier used by the payer.
|
 Payment Lookup ButtonUse this button to lookup an existing payment record for editing purpose.
|
 Payer IDEnter the payer ID in this field while entering a new payment or use the Payer Lookup button (Field 8) to select the payer who you receive the payment from.
|
 Payer Lookup ButtonThis button provides you the mechanism to lookup the payer you received the payment from, if the payer ID is not known.
|
 Payment Post DateThe date associated with the payment posting.
|
 Check AmountCheck or the total payment amount.
|
 Invoice IDEnter the invoice ID of the claim, you want to apply the entire or a portion of the payment to.
|
 Invoice Lookup Button<TODO>: Insert description text here...
|
 Invoices GridThis grid holds the invoices, for which the payment amount has been applied, during the progression of entering a new payment of of the existing payment.
|
 Invoice Pay AmountEnter the portion of the payment you want to apply to the invoice entered in the invoice ID field.
|
 Payment Detail GridThe grid displays all the line items of the invoice, to apply payment against each line item.
|
 Auto Apply ButtonThis button when enabled can be used to autoapply the payments against each line item. If the system possesses the history of payment from the payer, for the line item, you will get the expected results other wise this button will apply the available funds as it navigates through items.
|
 Invoice ParticularsInvoice particulars portions of the screen, displays billed amount, applied amount, written off amount, the balance of the invoice and the UnApply button to undo the line items applied amounts in one click.
|
 Payment ParticularsThe payment particulars portions of the screen, displays the applied amount and the Unapplied amount of the entire check.
|
 Delete Payment ButtonThis button is used to delete the payment applied towards the displayed invoice only, along with any secondary invoice created because of the primary payment. This button does not delete the entire payment (check), use the Void Check Button instead to delete the entire payment.
|