Payer Management is the tool in Prolis, to setup or maintain an Insurance Company to whom, the laboratory can submit the claim for services performed for a patient. These payers consist of commercial payers as well as the Government agencies like Medicare, Railroad Medicare, Medicaid or Public Aid.
This routine consists of 4 Tabs, Insurance Information, Contract Management, Billing Requisites and the Billing Rules.
Instant Procedure:
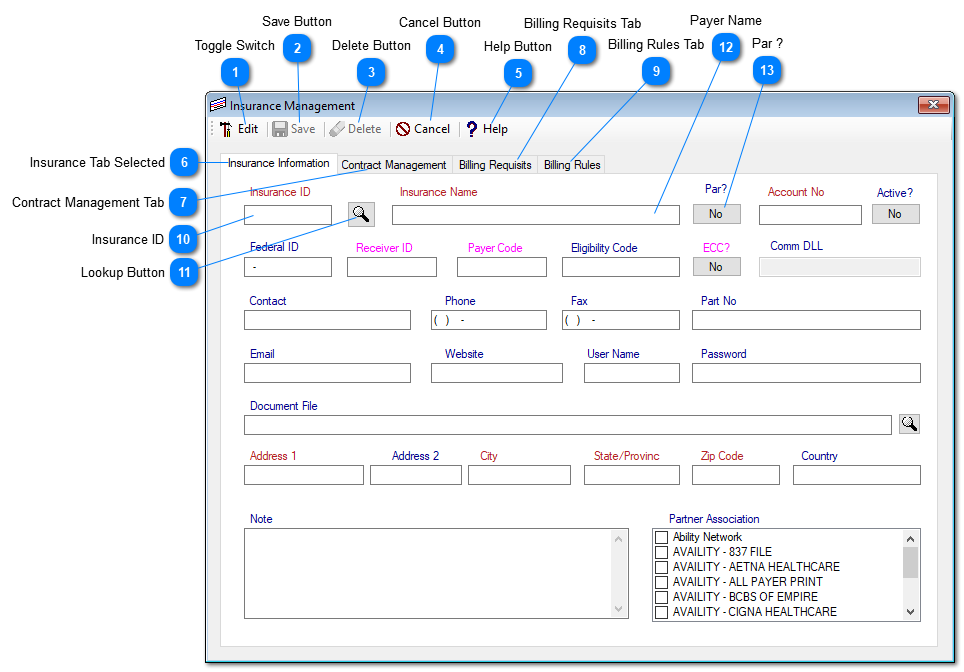
Click the Toggle button (1) per your need, New or Edit.
For a new record, enter all the information in to the RED color labeled fields (required) if not populated by the system.
Magenta color labeled fields are conditionally required. Receiver ID is required if one payer has been entered in the system multiple times (differentiating its state wide operation by its entry). Payer code is required for electronic billing along with its counter part check, to be 'Yes'.
For the navy blue color labeled fields, provide as much information as you can and save the information by clicking the 'Save' button.
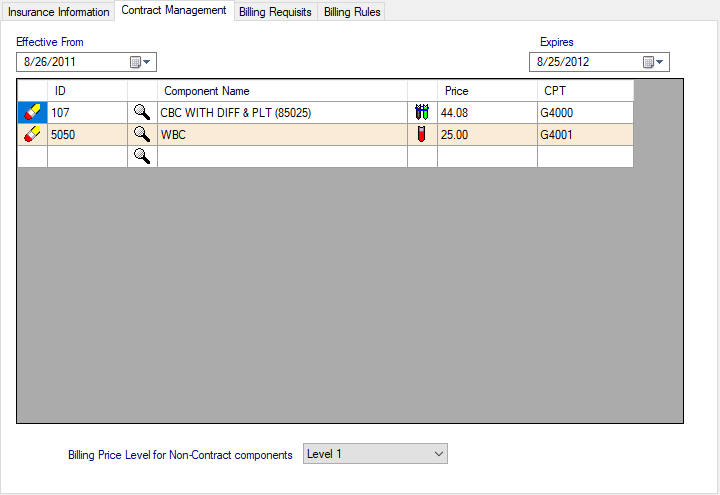
Instant Procedure to define the contract:
While the desired payer is displayed in the routine, click the Contract Tab.
Specify the contract period by entering the effective (start) date and the Expire date.
Inside the grid, under the ID column, enter the component service ID if known or use the next adjacent lookup button for the desired component.
When the component displays, change the price to the desired value. You may ignore the CPT column.
Enter as many items as you want. After entering all the contract items, select the pricing level to be used for the item being billed, not found in the
contract. If none is selected, system would select the list price. Either continue setting up the other tabs or save by clicking the Save button.
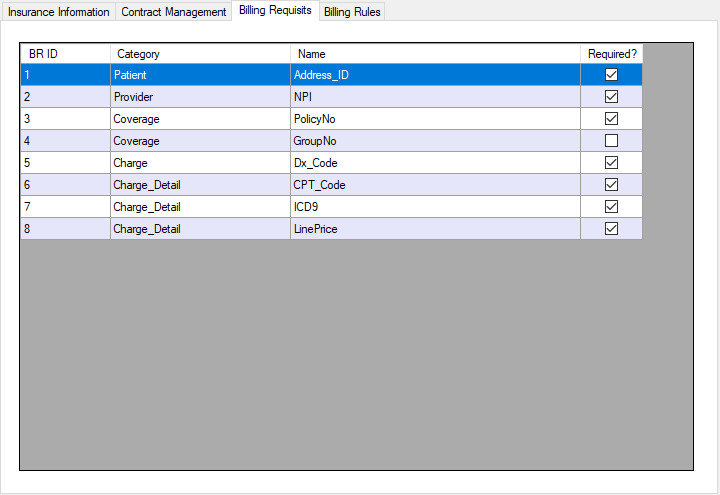
Instant Procedure to setup the Billing Requisites:
While the desired payer is displayed in the routine, click the Bill Requisites Tab.
Click the required column to place or remove the check against the listed item.
When done configuring all the items, either continue setting up the other tabs or save by clicking the Save button.
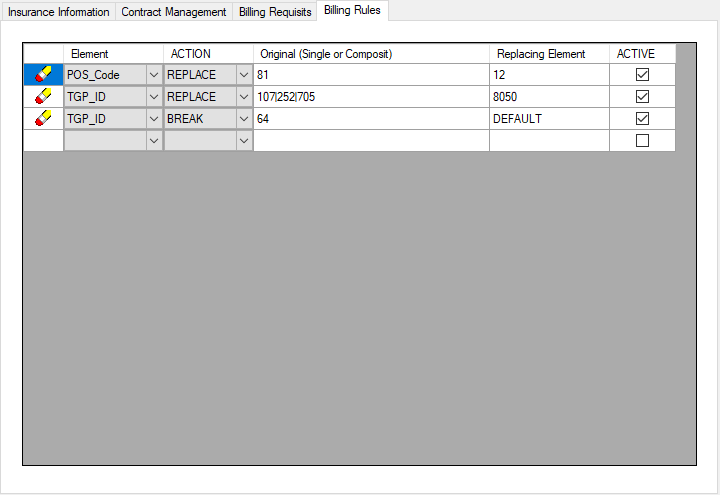
Instant Procedure to setup the Billing Rules:
While the desired payer is displayed in the routine, click the Billing Rules Tab.
Select the desired Element from the Element dropdown. Possible choices are TGP_ID (a billable component), CPT_Code (the Authority issued and accepted
identifier for the billable component) and the POS_Code (Place of Service code, the Authority assigned code for the service provider type). A laboratory provider is identified with the code '81'.
The ACTION column dropdown has 2 choices, REPLACE and the BREAK. You select the choice depending upon your need of looking Prolis to run your custom action while synchronization.
The Origin column entry represents the value of the element selected, that you want the action be executed on. It could be a single billable or a composite (multiple billable components). The syntax to define a composite billable is the numerical IDs of all components of the composite separated by the pipe ( | ) character. The composite must not start or end with the pipe ( | ) character.
The Replacing element is the target output of the action. For a replace action, this element value will replace the original value of the element. The BREAK action is applicable to the billable components like a Gorup or a Profile. This action will transfer the constituents of the original Billable or Profile.
The composite Origin is not supported by the elements (CPT_Code and POS_Code) other than the TGP_ID.
The ACTIVE column, if checked, makes the rule line active otherwise is disabled.
 Toggle SwitchClick this switch to change the routine's mode between 'New' and 'Edit'. The 'New' mode is used to enter a new payer. The 'Edit' mode is selected to modify the information of an existing payer.
|
|
 Save ButtonClick this button to save your entries in the routine. This button becomes available when the routine is ready to save the information. If all the red labeled fields are not provided with the information or at least one of the pink labeled fields, is missing the information, the Save button will not be available.
|
|
 Delete ButtonThis button is clicked to delete the unused payer record. The system does not allow to delete a used payer record.
|
|
 Cancel ButtonThe cancel button is used either to stop a long running process in the background, or if no process in running, is used to exit from the routine.
|
|
 Help ButtonClick this button to access the help documentation.
|
|
 Insurance Tab SelectedSelect this tab (is selected by default upon accessing this routine), to enter the information for a new payer to be added or modify the information of an existing payer.
|
|
 Contract Management TabSelect this tab to enter a new or modify an existing contract between the lab and the payer.
|
|
 Billing Requisits TabSelect this tab to modify the billing prerequisites for the selected payer in the routine. The billing prerequisites are not activated when a new payer is added in to the system. You need to access the payer in the 'Edit' mode and save it, to activate the billing prerequisites.
|
|
 Billing Rules TabSelect this tab to enter the billing rules for the payer displayed on the routine.
|
|
 Insurance IDA system generated numerical ID for the payer, to be entered. While in the 'New' mode, this ID can be over written if you have a sold reason to do it.
|
|
 Lookup ButtonThis button is available only in the 'Edit' mode and is used to find a payer, to access for any reason.
|
|
 Payer NameIs a required field
|
|
 Par ?It is used to let the system know if the lab is participating provider for the Payer being setup. This answer will guide Prolis to determine out sourcing the lab services for patients having insurances, the laboratory is not participating with. Click the Par? toggle switch for No or to Yes.
|
|