Use this routine to post an electronic payment (electronic remittance advice, ERA, alternatively called 835 file) against the Insurance billing (Third Party Billing).
Instant Procedure
It is recommended to create a local folder on your PC's C drive, named Unprocessed and download your ready ERA files from the Clearing House Portal and save into the 'Unprocessed' folder, so to access these files for processing through.
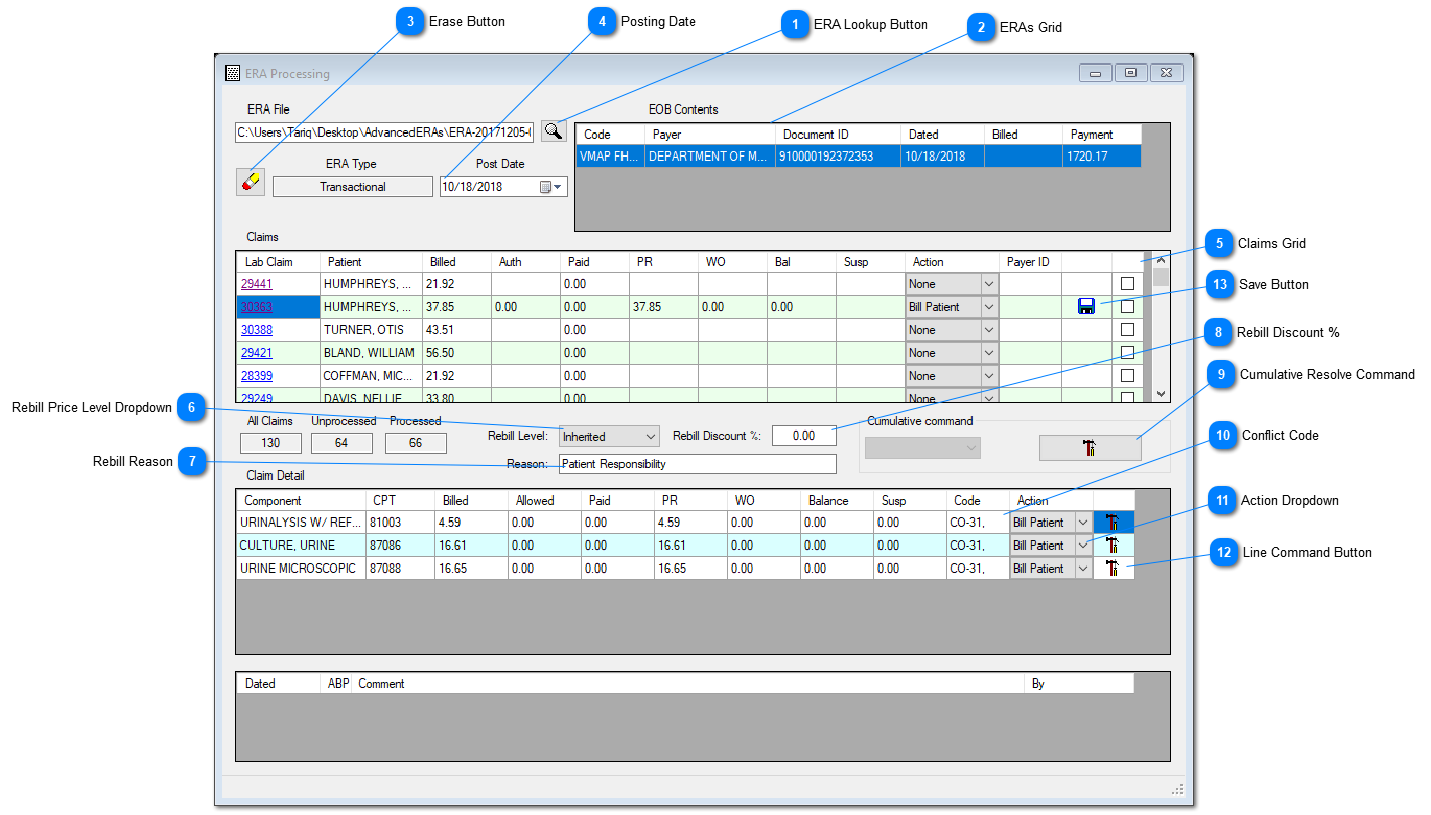
a. Click the ERA Lookup Button (Field 1). Navigate to the 'Unprocessed folder to pick the file to be processed.
The file name will appear in the ERA File field and if the file has not been processed through Prolis already, its particulars will be displayed in the ERA Grid (field 2) otherwise nothing will be displayed in the ERA Grid.
b. Click the row representing the ERA to be processed. Prolis will start listing the claims contained in the ERA, within the Claims Grid (Field 5). Each claim needs to be processed one by one (no cumulative operation).
c. Click the underlined Claim ID in the Lab Claim column. The system will display all the line items of the claim in the Claim Detail Grid.
d. Select the 'Action' using the Action Dropdown (Field 11) based on the Conflict Code (Field 10) and click the Line Command Button (Field 12).
e. Repeat the step 'd' above for every line item in the Claim Detail Grid.
f. Once all line items resolved, a Save Button (Field 13) will appear with the Claims Grid, for the row that's Claim ID was clicked to process (and is selected).
g. Click the Save Button (Field 13) appeared in previous step, to save the claim's payment.
h. Once all the ERA claims have been processed, Prolis will mark the ERA as 'DONE' and transfer the ERA file from the 'Unprocessed' folder to 'Processed' folder (if does not exist, Prolis will create it automatically).
Note: The Action within the Claims Grid, is handled automatically by Prolis. Based on the system's amount distribution to various columns that results from the ERA notations within the file, system will write off some amount, leave an amount as a n unpaid balance and may create a secondary invoice to the patient
for its responsibility. Since this routine's processing can not be undone, the manual Payments routine be used for edit and delete purposes.
 ERA Lookup Button <TODO>: Insert description text here...
|
 ERAs Grid<TODO>: Insert description text here...
|
 Erase Button<TODO>: Insert description text here...
|
 Posting Date<TODO>: Insert description text here...
|
 Claims Grid<TODO>: Insert description text here...
|
 Rebill Price Level DropdownThis field enables the lab to re-bill the charges to the patient using a different price level than the one used
for the insurance billing. Normally this field is not used unless the lab has a policy to use a different rebill prices,
Options provided by this field are;
List Price: Default of the 10 price levels supported by Prolis.
Level 1 thru 9: 9 various pricing levels supported by Prolis.
Inherited: Pricing level used when billed originally to the Insurance.
|
 Rebill ReasonThis field can be used to log in the reason to bill to the patient. The default is 'Patient Responsibility.
|
 Rebill Discount %Provide the percentage number, the rebill price be calculated after applying the discount of.
For example, the Insurance billed price was $ 10.00 and you provide the number 80, the system
will apply a discount of 80% and the Rebill price will be $ 2.00
|
 Cumulative Resolve CommandThis command button is active only if the system has selected the action (field 11) of all line items
from its memory. When active, a single click of this button can resolve the entire claim, instead of
clicking all the line command buttons (field 12). But if this button is not active, every line command
button must be clicked to resolve the claim.
|
 Conflict CodeA code provided by the Payer for the reason, an amount (indicated in the Susp column) fell into a conflict
category. The conflict amount must be resolved by selecting the action (field 11) and executing that
action by clicking the line command button (field 12), for every line item, to resolve the claim.
|
 Action DropdownThis drop down provides various actions a user can select, to take for a resolution of the line item's Susp amount.
Following are the actions offered by Prolis;
Balance: This action will transfer the Susp amount to the Balance column.
Bill Patient: This action will add the Susp amount to the Patient Responsibility (PR) column amount.
Bill Insurance: This action is yet to be function coded and should not be used until declared functional, by ASSC.
Refund: For future use. Do not use this action until declared functional, by ASSC.
Reverse: For future use. Do not use this action until declared functional, by ASSC.
Write Off: This action will add the Susp amount to the Write Off (WO) column amount.
|
 Line Command ButtonClick this button after selecting the action (Field 11), to resolve the Susp amount to zero (0.00).
|
 Save ButtonClick this button to save the payment against the corresponding claim (claim number in the left most column of the row).
|